I have an amazing friend who gave up some of her precious time yesterday to help my son. She asked for nothing in return but I wanted to show her how much I appreciated it, so I made something for her family.
It was another one of those things in my head that I was excited to see come to life. I didn't have any ribbon that I liked to go with it so instead I used some fabric to hang it with. Now I have about 50 others in my head for different situations, like little girls rooms, kitchens, etc. I will definitely have to keep this one in mind for teacher gifts and baby showers. ;) Thanks Amber!
Friday, August 31, 2012
Big frame with little frames
Don't you just hate when you have an image in your brain about something that you want, but then you look everywhere and you can't find it, or you can't afford it? One of my favorite things is when I have a situation like that and then am able to create something on my own that fits exactly what I imagined. At the end of June my whole family went to Hawaii. I just got a really nice camera for mother's day so I set up the tripod and got some nice family photos. Then when I got home I really wanted to display them nicely.
I have frames all over my house, but that just didn't seem big enough. I didn't want a whole bunch of smaller frames everywhere, I already have a frame collage in the hall way. Instead we decided to make a frame to fit one of the walls over the couch.
So we used base board, staples and black spray paint and made a 4 ft. wide frame.
Then we cut a piece of beadboard we had left from our kitchen and I painted it the same color as the wall and attached the frame to it.
Next I got 4- 10x14 frames and put the four pictures I wanted in them. Then I attached the four frames with some removable velcro strips, that way I can change the pictures out without ruining the frames or the beadboard.
Voila! Big, sturdy frame that fills the wall. I think next we might put some sconce lights on each side of it.
Thursday, August 30, 2012
Coffee Table
A couple weeks ago we were getting rid of the last of the stuff we had in storage and found a little table that we have had for a while. I totally forgot that it was in there.
I don't really need another small table, but we didn't have a coffee table so I refinished it.
And now it is pretty and useful.
See how cute!
Wednesday, August 29, 2012
My summer vinyl projects
Just a few simple vinyl projects from the summer.
The tree in the upper right corner is vinyl on canvas. That is my grandma's family tree. She is one of seven siblings so each big branch represents a sibling. Then each of those branches is split into a branch for each of their children and so on. On each branch are small green vinyl leaves with each persons name on them. So my grandma's branch is the second from the bottom on the right, my dad has his branch which is split into four for each of his children and then my branch has four leaves for me, Don and our two kids.
Labels:
vinyl
Tuesday, August 28, 2012
Adding character to my boring front room
I am not really sure why home builders find it important to include front rooms. They are usually connected to something else, like in our case our dining room, they are usually too small to really function as much and they take up square footage that very easily could have been redistributed to other rooms. I have owned three homes with front rooms and the only thing I have done with each of them is plunk a couch down in them and walk through them occasionally. I guess I just feel like each room should have a purpose and I can't find my front room's purpose. It is the neglected room both activity wise as well as creative wise. So this is what our front room was.
Very empty and boring. The table used to be the other direction and there was a lot more room for...??? I tried putting a small couch in there, but it didn't seem to fit right. I tried moving my office in there, but that just looked cluttered. So until I figure out what I really want in there (I am thinking built ins, but that may take a little while to get to), I am leaving the front room part empty and just focusing on the dining portion. Regardless though, it needed something, so I added some character to the walls.
And we made our own paneling.
Here it is finished with the paint and trim. I think that helps a lot. That will have to do for now.
Monday, August 27, 2012
Entry Hall Wall
Well I have shown you my cute hall mirror, but I haven't shown you the table that is under it yet. Let's start out with the slow evolution of my entry hall.
This is what it looked like when we first moved in. The other houses we have owned have only had small entry areas that could not fit anything so when we finally had a long entry I had no idea what to do with it. I tried moving different things there, but none of them ever looked like they were meant for that space. So, as I have grown to love, I decided to make something just for that wall.
This was a bigger challenge to figure out than I thought. It happened gradually in very small doses.
First I added some vinyl to the wall. That is a verse from a song I really like.
I wanted it to look like it was being tossed in the wind like a leaf on Winnie the Pooh.
But the wall still looked blank.
So we built our first table.
That helped a lot, but it still felt like there was a lot of wall there.
That was where the mirror I made from the armoire door came in handy. It fills it up perfectly. Now the wall feels complete, not too crowded, but not too empty.
Sunday, August 26, 2012
Armoire Redo
So it had really gotten to the point where every time I walked into my room I cringed at the sight of my TV. It was on a glass stand, which itself wasn't bad, but the outrageous amount of cords all up the back looked so cluttered that there really was no way to make the area look nice. I decided we needed something, a TV area face lift. I was sick of the video games and movies and remote controls and everything else that would accumulate near the electronic device that I have an extreme love hate relationship with (the hate is stronger than the love actually). To Craig's List I went to find a good sized armoire that I could refinish to cuteify (sometimes I have my own language) that side of my bedroom.
I found this big guy, which would definitely not match anything we had, but for the price I paid I could paint it and make it into whatever I wanted.
Here it is painted and it is a massive improvement to the cord chaos we had going on before. I should have taken a before picture, but I just could not bear the site of it anymore. Just believe me though the after is way better.
Once we got it in the room I put the doors back on it, but they stuck out a little more that I liked and I knew we would probably never close them. So I took them back off and decided to use them for something else. I turned one into a sign for the wall. I used some left over beadboard from the kitchen, added some vinyl and distressed it a little.
The other one I made into a mirror.
Saturday, August 25, 2012
Kitchen Redo
I really love our house, but lately I have not really been in love with the color of wood. There is just something so ordinary about Honey Maple cabinets. I am sure there are many many people out there with that color cabinets and there is absolutely nothing wrong with that color. I just needed something different in my kitchen this year. Since the wood was still in really good condition it didn't make sense to get new cabinets, so we decided to just refinish the ones we had.
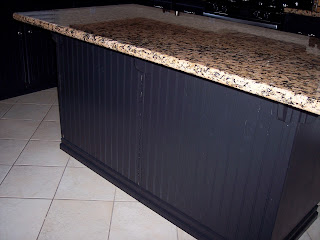
Like I said, they weren't bad cabinets. They were still in excellent shape and the counter tops are brand new. Since the rest of our house is pretty neutral, I decided to go with black and put some beadboard and handles to finish things off. The paint color was actually really scary, there is no turning back from black. But I think they turned out really nice and they definitely have a more updated look.
Before |
Like I said, they weren't bad cabinets. They were still in excellent shape and the counter tops are brand new. Since the rest of our house is pretty neutral, I decided to go with black and put some beadboard and handles to finish things off. The paint color was actually really scary, there is no turning back from black. But I think they turned out really nice and they definitely have a more updated look.
After |
Subscribe to:
Posts (Atom)